Call Flow Builder Nodes
Using Variables
Variables can be an important aspect of Call Flow Builder. They allow you to create a dynamic Call Flow that responds to user input and other outside information. While there is a Set Variables node that allows you to create your own variables at any time, you can also use variables from Request nodes or even get variables from the inbound call. All variables must be in the following format to signal to the Call Flow Builder that it should process a variable: %{<variable>}.
Inbound Call Variables
The following variables exist for all inbound calls. At this time, the direction is always inbound, but the other values are very useful and can be referenced throughout the whole Flow.
%{call.from}
%{call.to}
%{call.direction}
%{call.call_id}
%{call.state}
%{call.type}
For Example:
Request Variables
Variables that you get from a Request module can be accessed using %{request_response.<object_field>}. For example, if we send a GET request to timeapi.io, the response we’ll receive will look like this:
{
  "year": 2023,
  "month": 7,
  "day": 27,
  "hour": 16,
  "minute": 9,
  "seconds": 9,
  "milliSeconds": 640,
  "dateTime": "2023-07-27T16:09:09.640945",
  "date": "07/27/2023",
  "time": "16:09",
  "timeZone": "America/Chicago",
  "dayOfWeek": "Thursday",
  "dstActive": true
}
To reference the “hour”, “date” and “dayOfWeek” from this response as variables in the Call Flow, we would format the variables like this:
%{request_response.hour}
%{request_response.date}
%{request_response.dayOfWeek}
Please note that response values that are strings will need special formatting to use them with conditional expressions or JavaScript operators. You will need the format %{vars.request_response.<object_field>'} to use the value of the string.
In the example above, the response parameter "dayOfWeek" has a string value of "Thursday". You can create the following condition that will only be met when the day of the week is Thursday:
%{vars.request_response.dayOfWeek == 'Thursday'}
You can also use slice() to remove everything from the string after the third character to give you a shortened day of the week (Fri, Sat, Mon):
Key: short_day
Value: %{vars.request_response.dayOfWeek.slice(0,3)}
Variables with JavaScript Operators
You can use variables along with standard Javascript operators. This can be useful if you need to alter a variable or pass a condition that matches an expression.
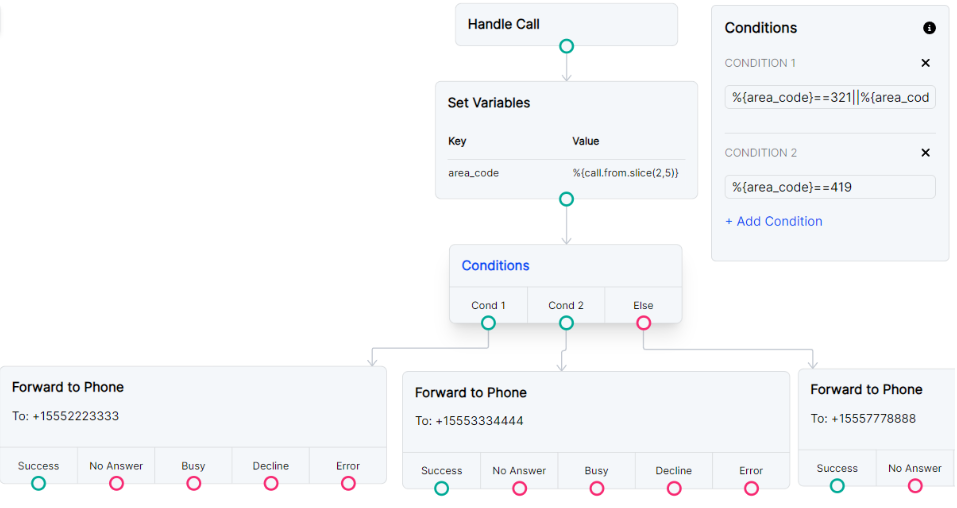
One example is using the slice() method to remove everything from the %{call.from} variable except for the area code of an inbound caller. Within a Set Variables module, you can set the following:
Key: area_code
Value: %{call.from.slice(2,5)}
You can even combine this with a Conditions node as in the example below. Condition 1 uses the OR operator to check if the area code is 321 or 407. If either of those is true, the call is forwarded to +15552223333. A second condition in the same node checks for a 419 area code and forwards the call to +15553334444.
Condition 1: %{area_code}==321||%{area_code}==407
Condition 2: %{area_code}==419
Action Nodes
Answer Call
Answer Call marks the beginning of a call flow. It is not strictly required, as all modules that progress the flow will also answer the call.
Hang Up Call
Hang Up Call will disconnect a call and end the flow. There is an optional drop down menu that allows you to pick a Hang Up reason. The default is Busy.
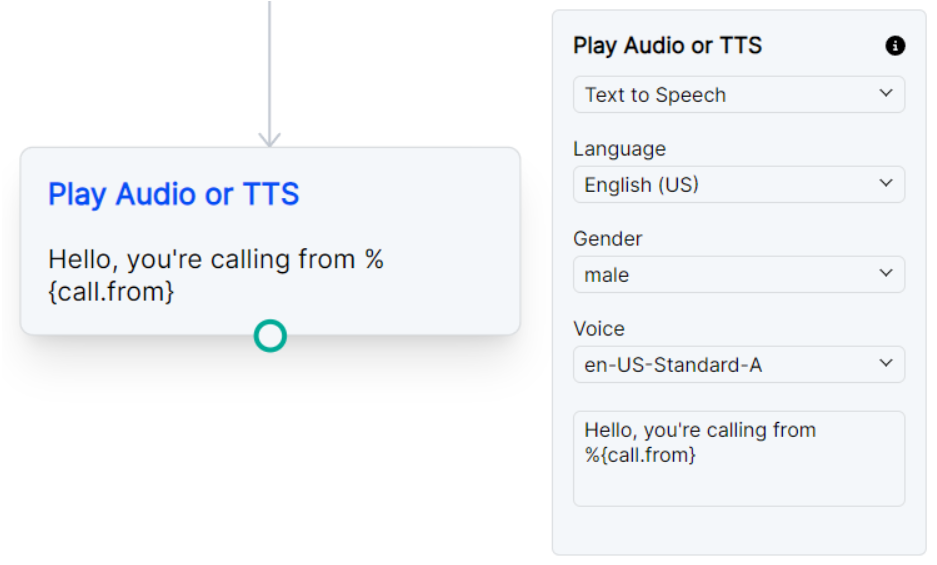
Play Audio or TTS
This node allows you to play an audio file, play silence, play a ringtone, or play text-to-speech.
- Play Audio File: Paste any publicly hosted URL for a WAV or MP3 file into the value field to play it into the call.
- Play Silence: Select "Play Audio File" and include a
silencevalue in the formatsilence:<time in seconds>(ex: silence:5). - Play Ringtone: Select "Play Audio File" and include a
ringvalue in the formatring:<time in seconds>:<ringtone code>(ex: ring:5:jp). Possible ringtone values are listed here. - Text to Speech: Provide any text for speech synthesis to say to the caller. If all optional parameters are left blank, the default voice used will be English (US), female, Salli.
- Language: Select what language the speech will use. Optional.
- Gender: Select what gender the speech will use. Optional.
- Voice: Select which voice model will be used. Please note that any voices that show (premium) next to the name will be billed at the Premium TTS rate. Optional.
- Text: Replace the "Write Something" placeholder with the text to be spoken by the voice model. Required.
Example
Send SMS
Send an SMS message.
- To phone number: The number to send the SMS to in E.164 format (ex:+15552223344).
- From phone number: The SignalWire phone number originating the SMS in E.164 format. This number must be assigned to an active messaging Campaign with The Campaign Registry. For testing purposes, you may use your Platform Free Trial number, but the "To" number above must be the matching partner Platform Free Trial verified number. Required.
- Text: Replace the "Write Something" placeholder with the text you would like to send. Required.
Example
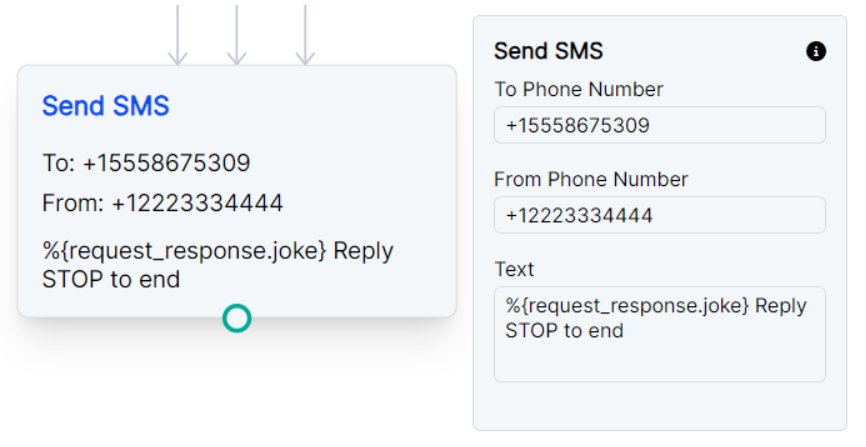
Send SMS with variable
The example below is connected with a Request module that sends a request to a joke API. Knowing the parameters of the API response, the module can pull the request’s response with %{request_response.joke}. This example also includes messaging opt-out verbiage since this is important to avoid SMS spam blocks.
Send SMS notification as Call Whisper
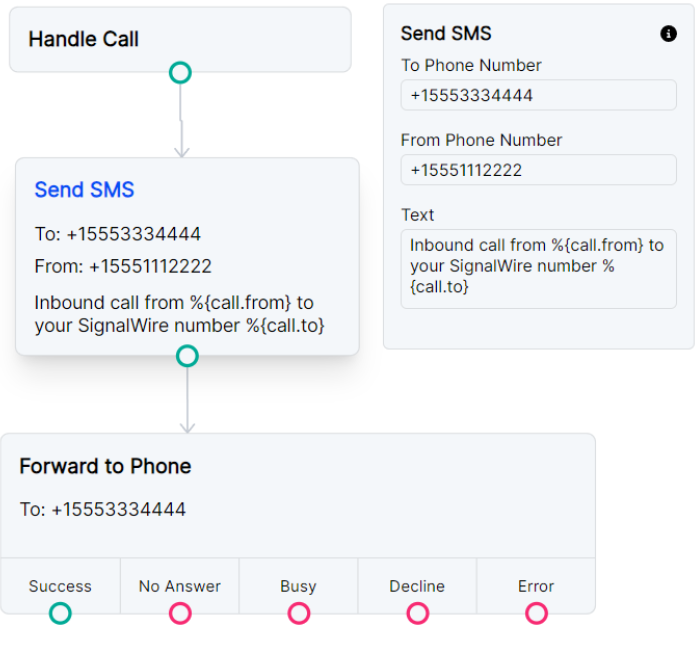
You might be using Call Flow Builder to forward calls to a personal cell phone. The example below will send an SMS to the specified phone number just before forwarding a call to that same number. This way you’ll receive a text letting you know this is a forwarded call from SignalWire and which original SignalWire number your caller dialed.
Forward Nodes
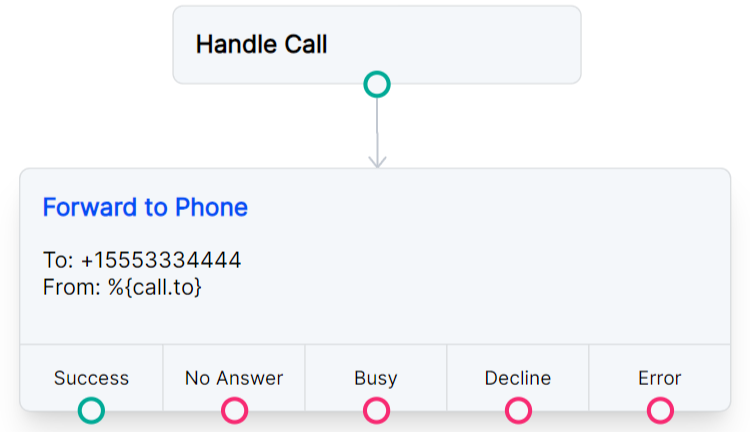
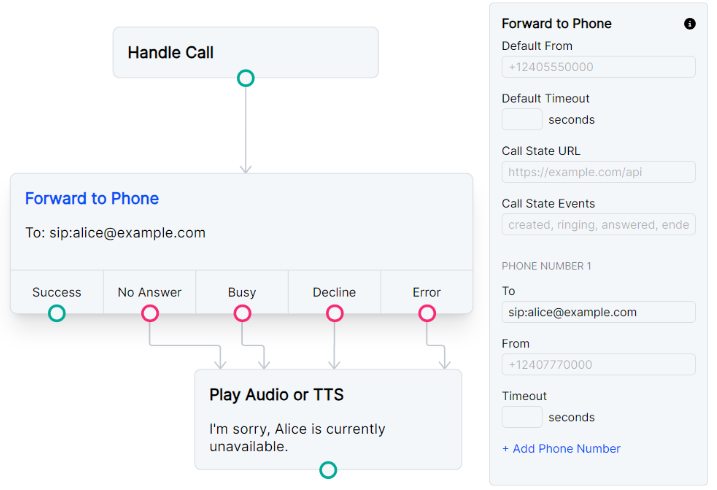
Forward to Phone
This node will allow you to forward the incoming call to another phone or SIP endpoint.
- Default From: The default number to originate forwarded call from this module. If left empty, the original caller’s number will be used as the "From" in the new forwarded call. Optional.
- Default Timeout: The module's default amount of time, in seconds, a call will ring before timing out and either disconnecting the call or attempting a new number. Default is 45 seconds. Optional.
- Call State URL: A webhook URL that will receive a POST request containing call details each time a Call State Event is triggered. You will need to choose which events you want listen for in the next field. If no events are chosen, the URL will receive no requests. Optional.
- Call State Events: The call state event to listen for. Required for Call State URL to receive event notifications. Possible values are
created,ringing,answered, andended. - Phone Number 1 To: The phone number or SIP endpoint that you want to forward the call to. Phone numbers must be in E.164 format (+15552223344). SIP endpoints require a “sip:” prefix before the address (sip:Alice@example.com). Required.
- Phone Number 1 From: The number originating the call to Phone Number 1. If left empty, the "Default From" number will be used. Optional.
- Phone Number 1 Timeout: The time, in seconds, that the call to Phone Number 1 will ring before timing out. If left empty, the "Default Timeout" will be used. Optional.
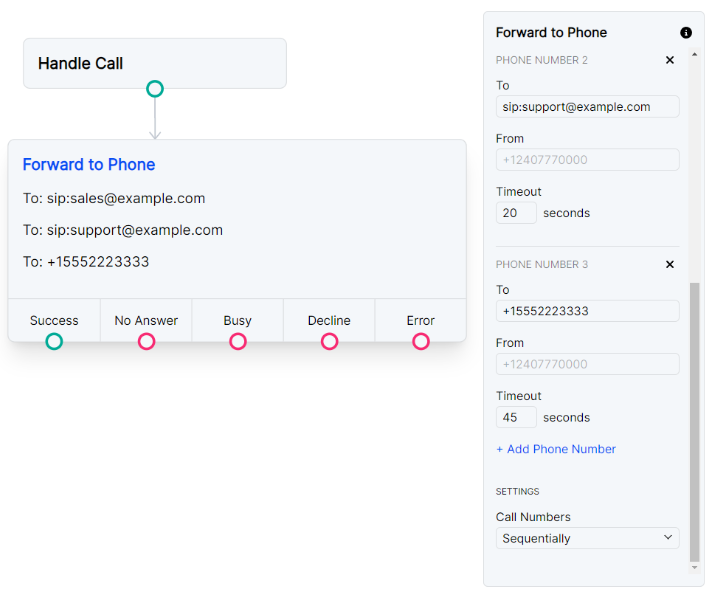
- Add Phone Number: You may choose to forward the call to multiple numbers. If additional recipient numbers are added, you can specify the "To", "From", and "Timeout" for each. Optional.
- Call Numbers: Choose to call numbers sequentially (one number will be dialed at a time, and if the number declines or the call times out, the next number will be dialed) or simultaneously (all numbers will be dialed at the same time and only the first one to answer will be connected with the inbound caller).
Examples
Forward to SIP
In order to dial a SIP endpoint, you will format the To with “sip:” followed by the endpoint’s address. If the endpoint is unavailable, the flow will follow one of the four failed routes depending on the SIP signaling that is received. You can give individual actions for each signal, or route them all back into the same module.
Forward to multiple SIP endpoints and phone
You can combine SIP dialing and Phone number dialing in the same module. The example below is dialing sequentially so the sales endpoint will ring for 20 seconds before moving on and ringing the support endpoint for 20 more seconds before finally dialing out to +15552223333.
Record Nodes
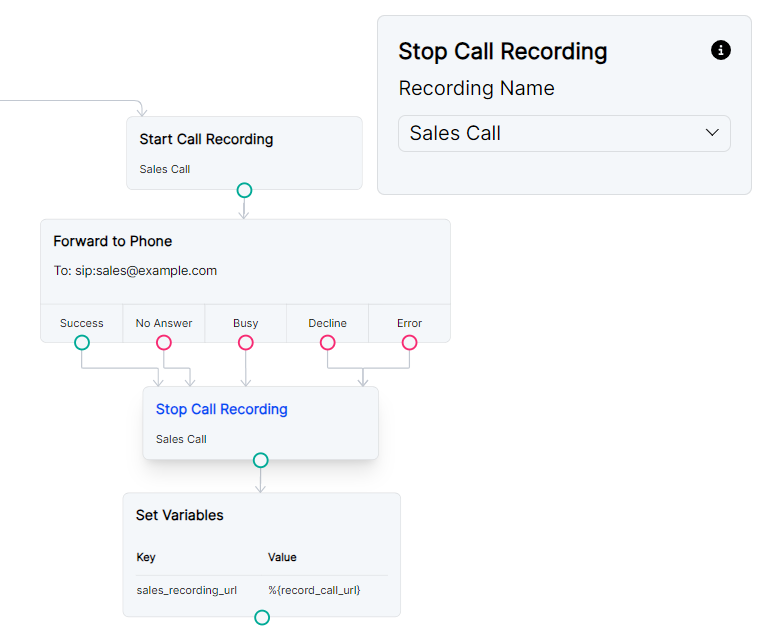
Start Call Recording
Start a recording with this node. The recording will automatically stop if the call is disconnected. To manually stop the recording, use the Stop Call Recording node.
- Recording Name: The friendly name you will use to reference this recording within your call flow and when using the Stop Call Recording module. This name is only used within the call flow and will not appear on any dashboard logging. Required.
- Stereo: Toggle this on to separate the two legs of the call recording into left and right channels.
- Beep: Toggle this on to play a sound to signal the start of recording.
- Terminators: The set of DTMF digits that can be used to end a recording. Optional.
- Format: Whether the call will be recorded as a WAV or MP3 file.
Stop Call Recording
Stops the specified recording action. Reference the recording URL in other nodes in the Flow using the variable %{record_call_url}. You can also access the recording URL from the call log details in your RELAY Space.
- Recording Name: Select which Start Call Recording module you want to stop. Friendly names from all of the "Start Call Recording" modules in the Flow are populated in the dropdown. Required.
Example
You can pair this node with a Request node to send the recording URL to the webhook of your choice. Please note that any later recordings in the Flow will overwrite the %{record_call_url} variable, so the Request node should immediately follow this Stop Call Recording node or use Set Variables to save this URL for a later request.
Voicemail Recording
This node uses the a synchronous recording method to record a voicemail. Reference the recording URL in other nodes in the Flow using the variable %{record_url}. You can also access the recording URL from the call log details in your RELAY Space.
- Stereo: Toggle this on to separate the two legs of the call recording into left and right channels.
- Beep: Toggle this on to play a sound to signal the start of recording.
- Terminators: The set of DTMF digits that can be used to end a recording. Optional.
- Format: Whether the voicemail will be recorded as a WAV or MP3 file.
Examples
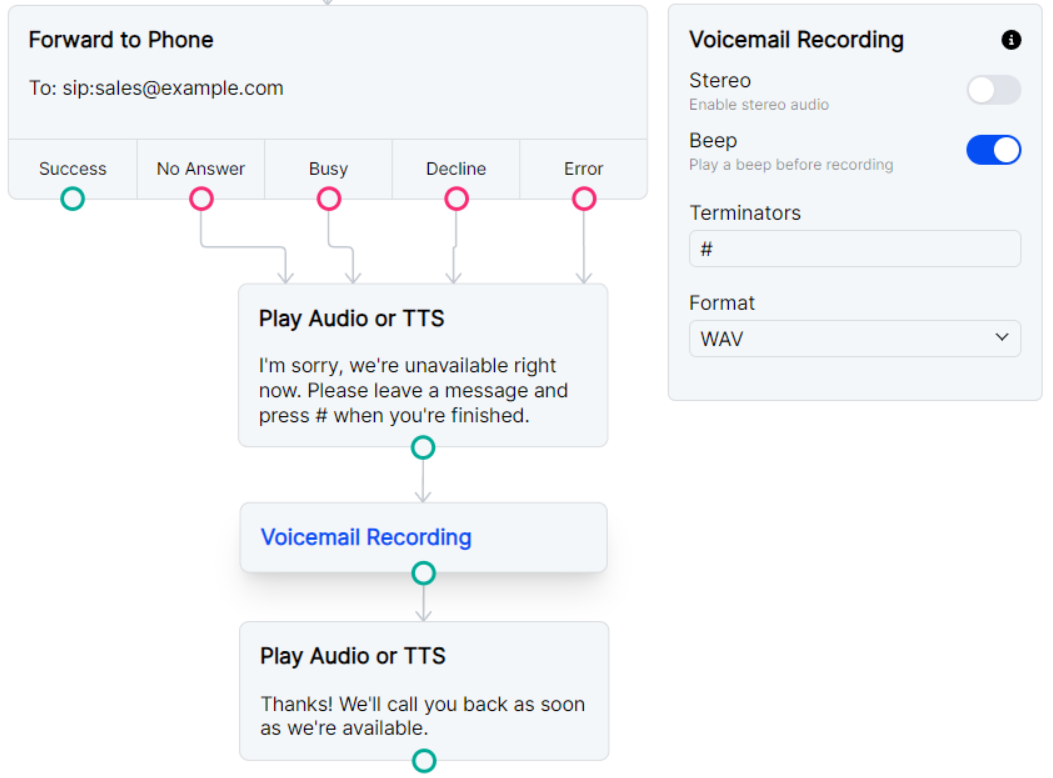
Simple voicemail with goodbye message
For a traditional voicemail experience, we recommend pairing the Voicemail Recording module with a Play Audio or TTS module and including a beep before recording. Including a terminator will allow modules to run after the caller is finished leaving their voicemail.
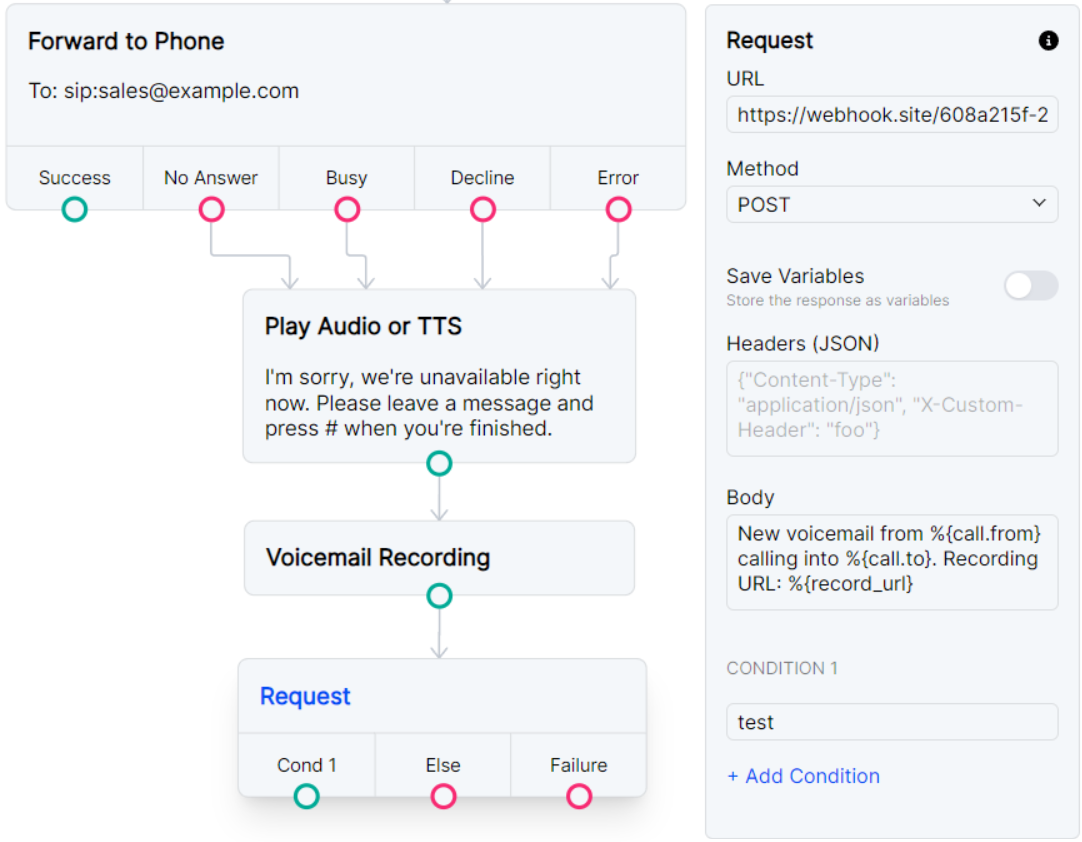
Record voicemail and send recording URL as a POST request
You can pair this node with a Request node to send the recording URL to the webhook of your choice. Please note that any later recordings in the Flow will overwrite the %{record_url} variable, so the Request node should immediately follow this Voicemail Recording node or use Set Variables to save this URL for a later request.
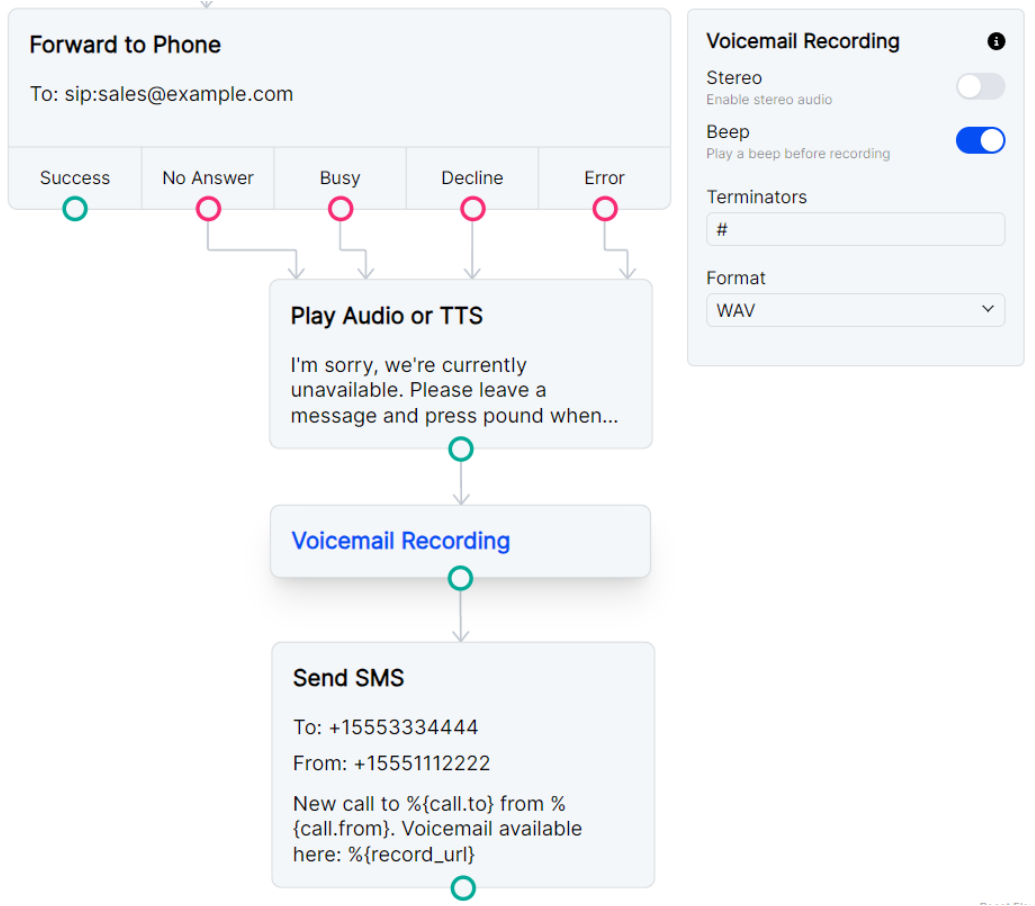
Record voicemail and send recording URL as SMS
You may want to be notified about a new voicemail with an SMS. You can follow the Voicemail Recording node with a Send SMS node and again access call data and the recording URL with {call.} and {record_url} variables.
Input Nodes
Gather Input
This is a prompt action node. You can deliver your prompt as an audio file or use text to speech. You can collect caller input with DTMF or speech. A new connection point will be added to the node for every option you include.
- Play Audio File: Paste any publicly hosted URL for a WAV or MP3 file into the value field to play it into the call.
- Text to Speech: Provide any text for speech synthesis to say to the caller. If all optional parameters are left blank, the default voice used will be English (US), female, Salli.
- Language: Select what language the speech will use. Optional.
- Gender: Select what gender the speech will use. Optional.
- Voice: Select which voice model will be used. Please note that any voices that show (premium) next to the name will be billed at the Premium TTS rate. Optional.
- Text: Replace the "Write Something" placeholder with the text to be spoken by the voice model. Required.
- Caller Presses: The digit used to proceed with this option. Optional. If left empty, this option will only accept audio input, not any DTMF tones.
- Or Says: A word or phrase used to proceed with this option. Optional. If left empty, this option will only accept DTMF tones, no audio input.
- Wait for Input: The amount of time in seconds to wait for the caller to provide input. Optional. Default is 5 seconds.
Examples
Simple Input
You can choose to accept both Speech and DTMF tones with your IVR. The caller in this example can either press 1 or say “sales” to connect with the sales line.
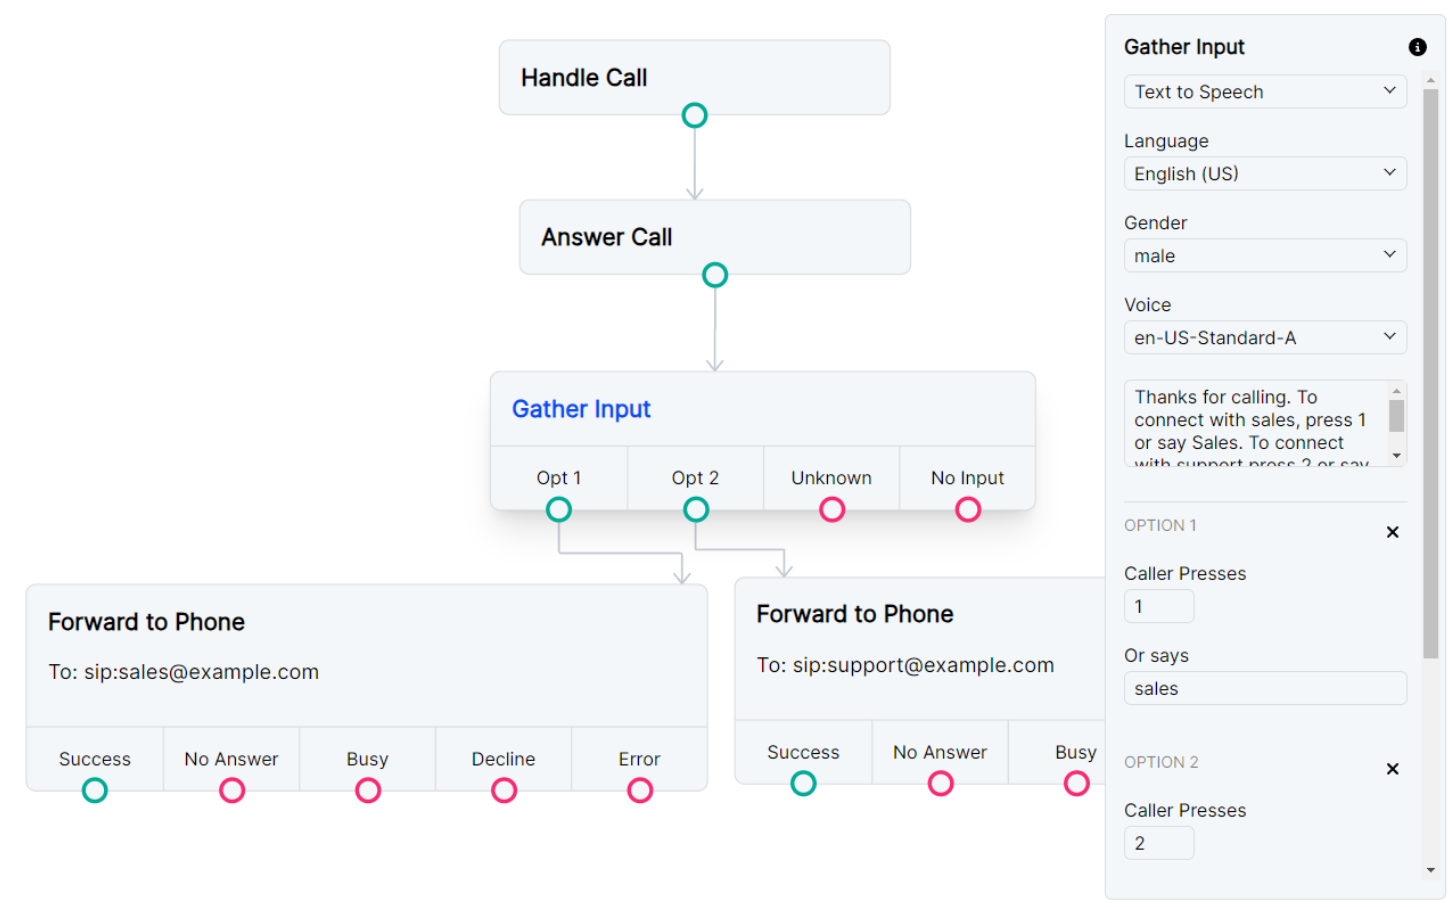
Gather input as speech or DTMF and send call to the selected channel.
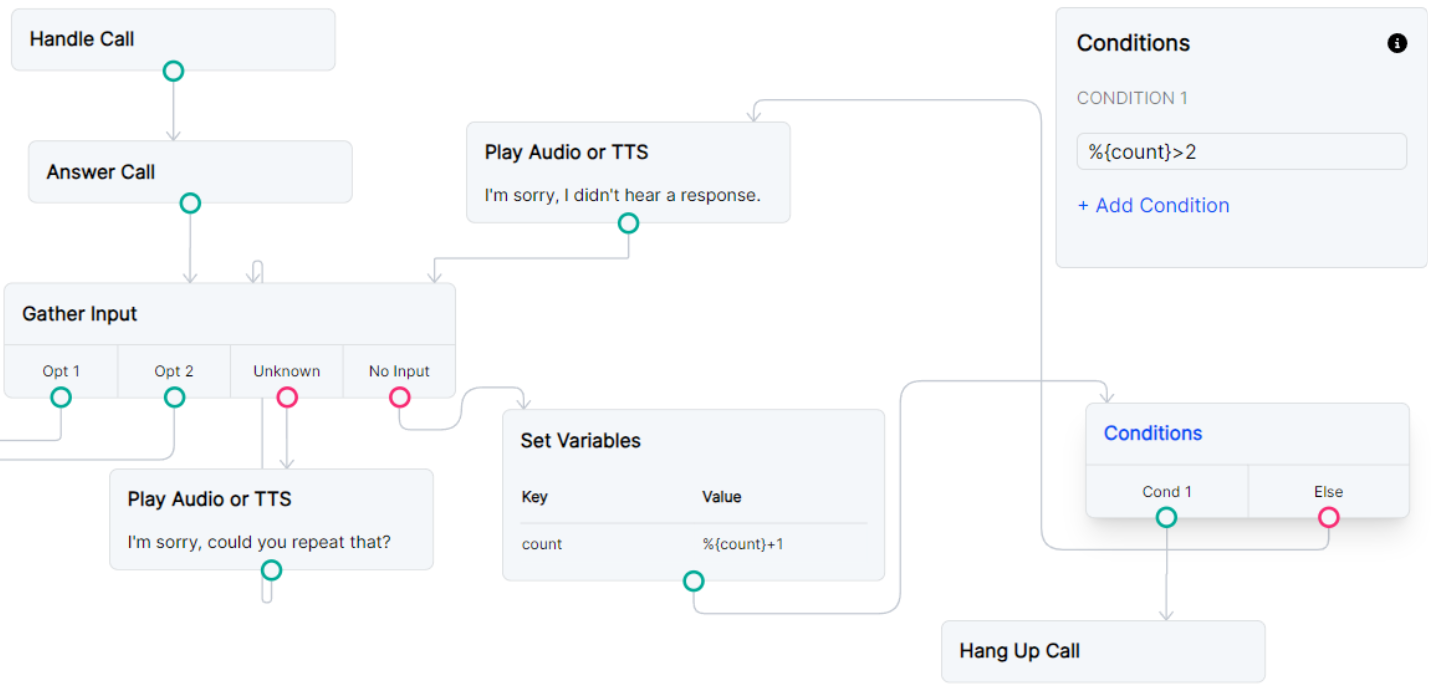
Input with infinite loop prevention
If you plan to loop your “No Input” route, you probably want to disconnect a call if the Gather Input module attempts to loop the call more than 2 times. You can do that with a combination of a Set Variables module and a Conditions module. If a caller dials your number and sits on the line in silence, your Flow will disconnect the call after a couple of loops.
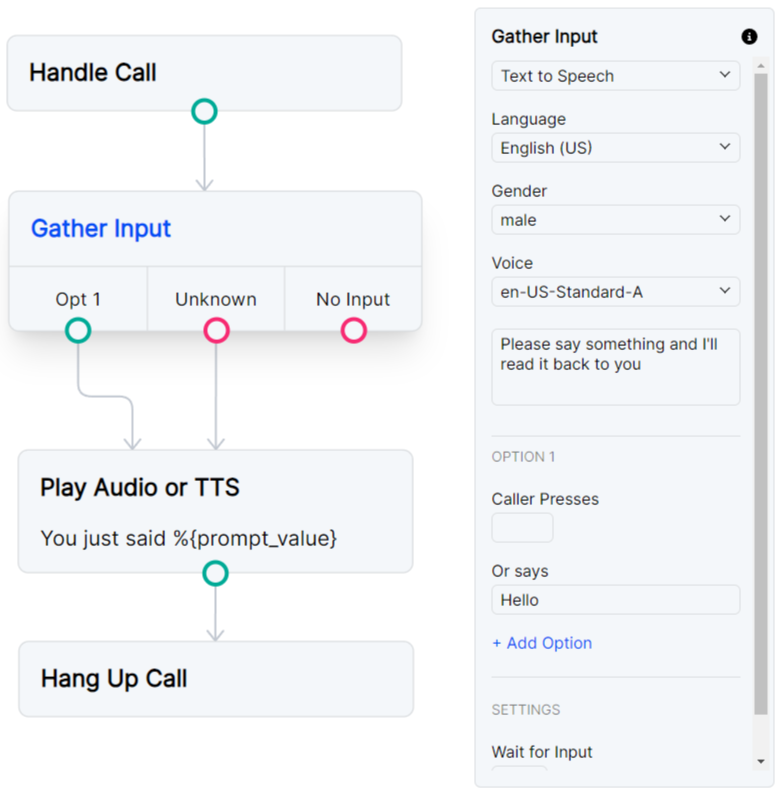
Accept any speech option
The “Unknown” route from the Gather Input module can be useful if you want to accept any and all speech recognition from your caller. A word or phrase is required in your Option 1 “Or Says” field so that your Gather Input module knows it is collecting speech. You can route that option to the same flow as the “Unknown” route so all speech options continue the same path. The variable %{prompt_value} can then be used in any module and will contain all speech that was detected.
Request
This node will allow you to make a GET, POST, PUT, or DELETE request to the specified URL. The response can be accessed in later modules with %{request_response_body}, and if you choose to save the response fields as variables, you can reference them with %{request_response.<object_field>}. It is important to note that later Request modules will overwrite the %{request_response} variables, so either use them immediately or store them with a Set Variables node.
- URL: A public URL to which the request will be made. Required.
- Method: Set the method that will be used in the request. Dropdown choices are GET, POST, PUT and DELETE.
- Save Variables: Toggle on to save the response parameters as variables to be used later in the Flow. The variables will be saved with the format
%{request_response.<object_field>}. One variable is set for each response parameter, so you need to know what is included in the response object. - Headers (JSON): Add any JSON headers that your URL may require in order to provide or gather the data you want. Optional. Valid header values are
Accept,Authorization,Content-Type,Range, and customX-headers. - Body: The content that will be sent in the request. Optional.
- Condition: Set one or multiple success conditions in this format:
%{request_response.<object_field>}. You will need to supply theobject_fieldfrom the expected response body. The "Cond #" path will be executed for a truthy condition. The "Else" path will be executed for a falsy condition. The "Failure" path will be executed in case of a request error. If you want the Flow to continue on one path regardless of the request response, simply connect all of the outputs to the same next node.
Examples
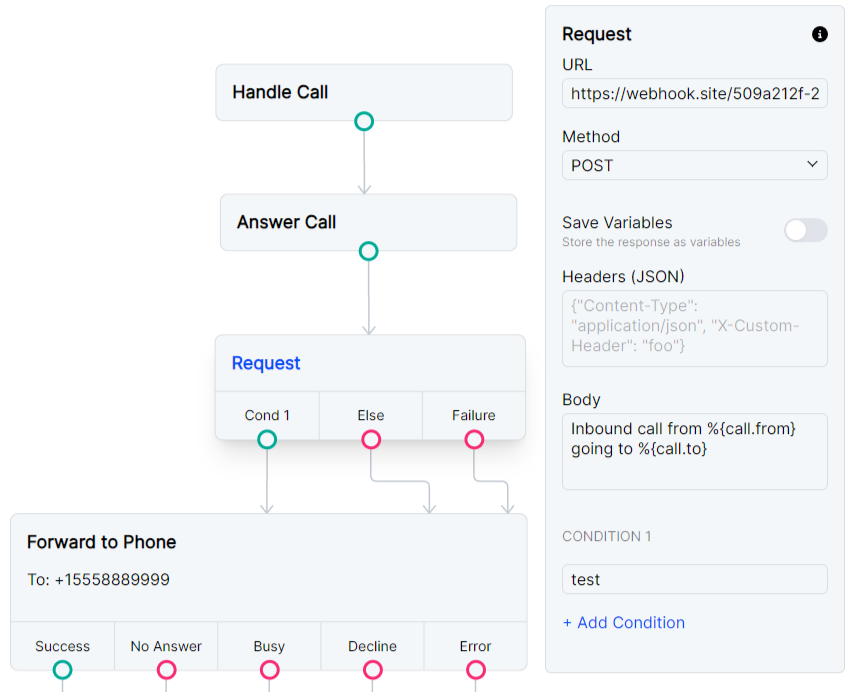
Using webhook.site to test requests
You can test the Request module with webhook.site. In the Request module, use the unique URL provided by webhook.site and copy the Body of the example below. You will get a POST to your webhook with details about the incoming call.
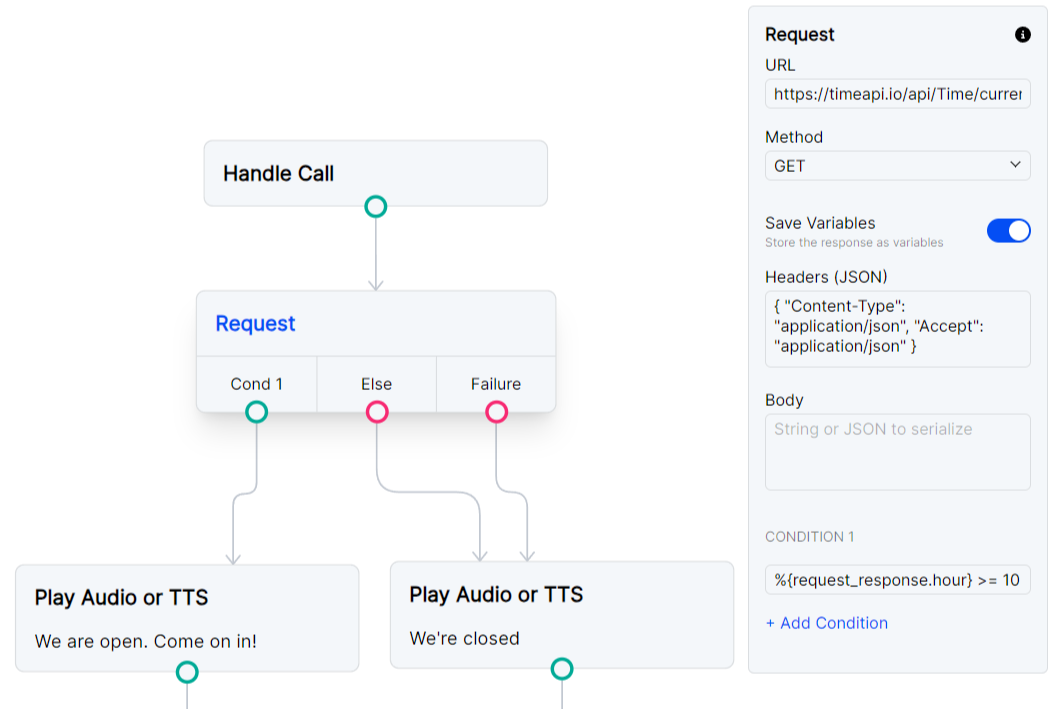
Route a call based on a request to check time
You may want your Flow to behave differently depending on the time of day. You can use timeapi.io to request the current time. This example uses an IANA timezone to look up the time and sets "Cond 1" to:
%{request_response.hour} >= 10 &&%{request_response.hour} < 20.
If the time is between 10am and 8pm, the success condition TTS will play. Otherwise, the fail condition TTS will play.
Decision Nodes
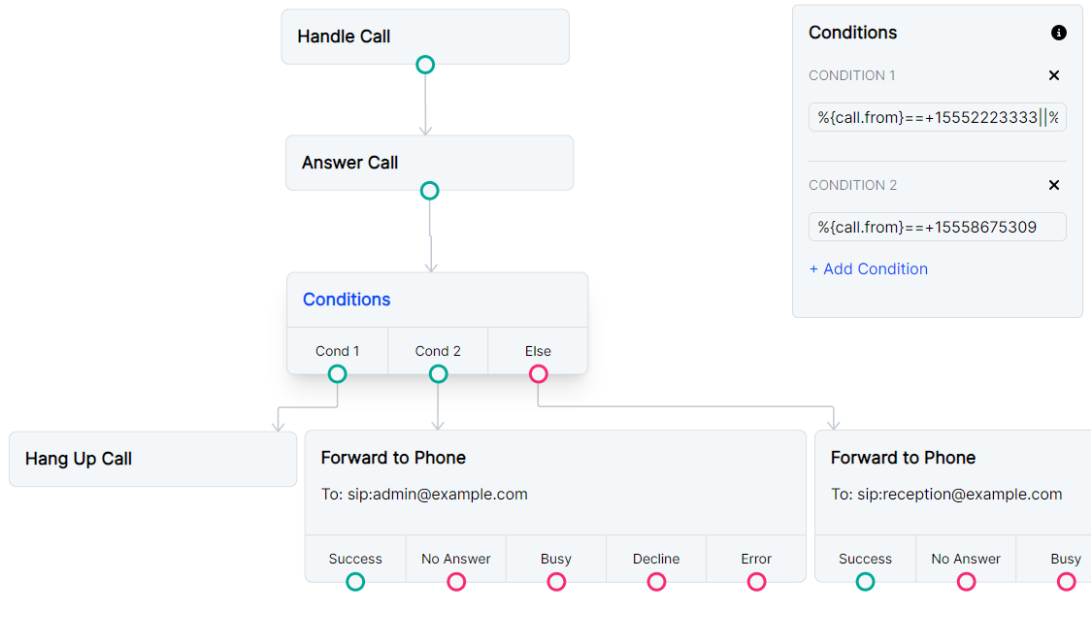
Conditions
A condition works like a JavaScript if statement. A condition field can reference variables that have been set in the flow with %{Key}, Request node responses accessed with %{request_response.<object_field>}, or call parameters such as %{call.from}. Add additional conditions to create else if conditions. The "Cond #" path will be executed for a truthy condition. The "Else" path will be executed for a falsy condition.
Example
Use conditions to create a block list
In this example, we immediately hang up calls from specific numbers on our block list and forward call from a VIP directly to our administration number. All other calls will connect to the main reception number.
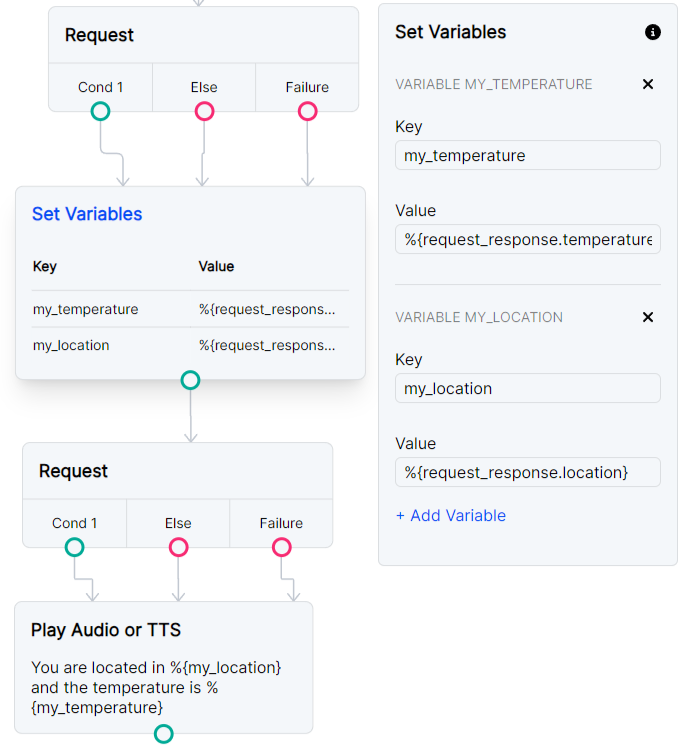
Set Variables
Use this module to set variables that can be accessed from other nodes in the Call Flow. The value can be a static value set as a string ("value"), a variable from another node such as a request response (%{request_response.<object_field>}), or a call parameter (%{call.from}). Access these variables in other blocks with %{<Key>} and unset variables with the Unset Variables node.
Example
Use Set Variables if you plan to use multiple Request modules in the same Flow and you need the variables to carry across the entire Flow. This example makes a request to an API for temperature and location. The request’s response is saved in variables called my_temperature and my_location. In order to make a new request to a new webhook, the Set Variables module is essential because the second Request module will overwrite the request_response. Your first variables will remain accessible using %{vars.my_temperature} and %{vars.my_location}.
Unset Variables
The Unset Variables is used to clear any variable that was set using Set Variables. All currently set variables are populated in the dropdown menu. You can unset multiple variables in one module.