Sending and Receiving Fax
It's easy to start sending and receiving Fax using SignalWire's APIs! You will need at least one number to send and receive faxes, so if you don't have one already, please follow the instructions below.
Obtaining and configuring a number
Log in to your SignalWire Space. From the Phone Numbers section, you can buy a new phone number.
Receiving your first fax
There are two parts to receiving a fax:
- A SignalWire Phone Number;
- The instructions to actually receive the Fax.
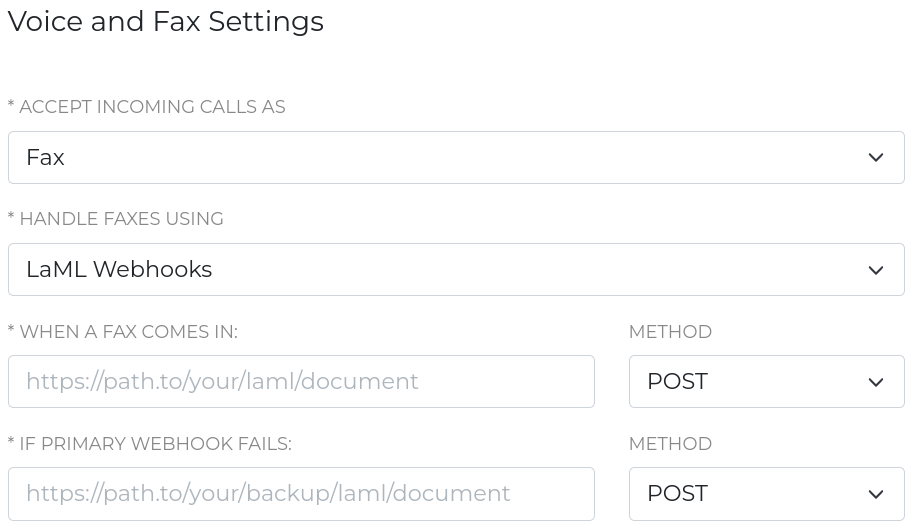
After you have acquired a number, or in case you have one already, open its settings by clicking on "Edit Settings". Scroll down until you reach "Voice and Fax Settings", as shown in the next figure, and configure it to:
- "ACCEPT INCOMING CALLS AS" -> Fax
- "HANDLE FAXES USING" -> LaML Webhooks

Setting up the instructions to receive faxes
Using XML Bins
XML Bins (also called LaML Bins) allow you to tell SignalWire how to handle calls, messages, or faxes by using instructions called Verbs. You can learn more about XML Bins on this article, but essentially we need to create a new Bin in the LaML section of the Dashboard with the following instructions:
<?xml version="1.0" encoding="UTF-8"?>
<Response>
  <Receive action="/fax/received"/>
</Response>
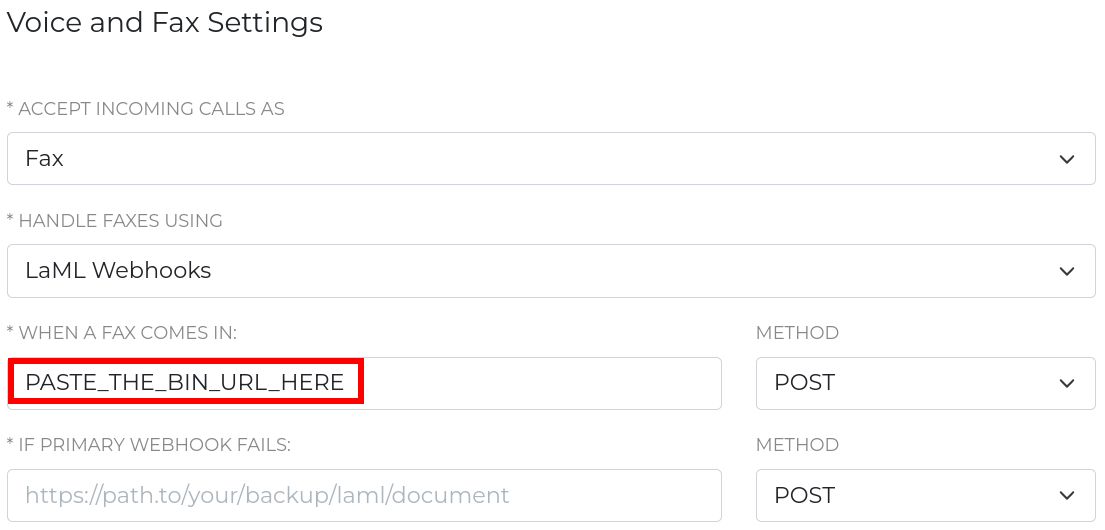
Lastly, we need to connect the phone number with the instructions to receive the fax, so we copy the Bin's URL from the XML Bins section of the Dashboard and paste it in the phone number's "WHEN A FAX COMES IN" field, like this:

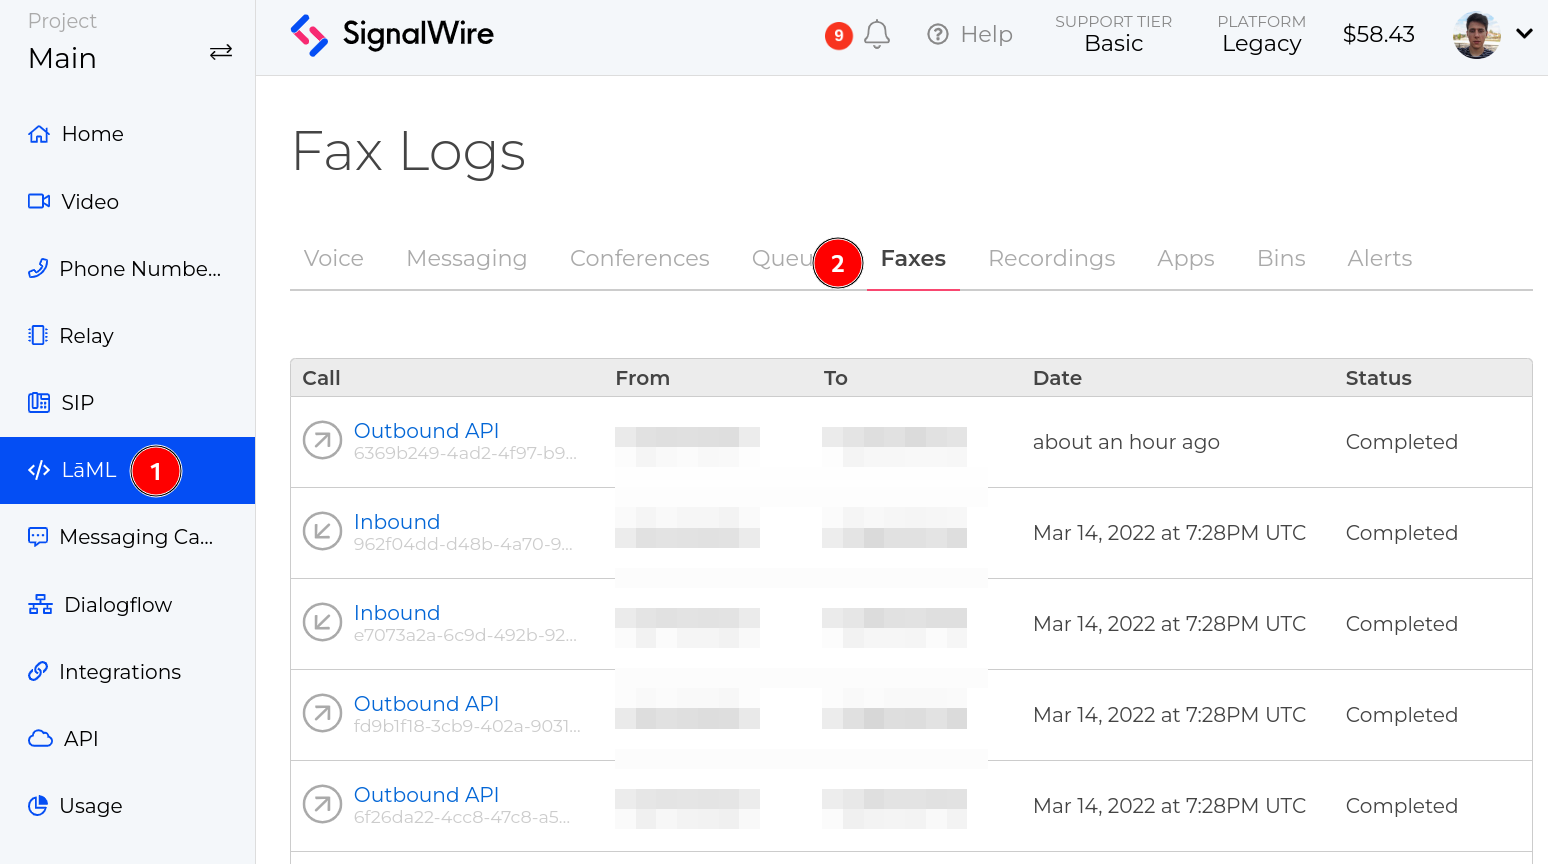
That's it! You can now start receiving faxes on your phone number, and they will appear under LaML -> Faxes in your Dashboard:

Using Compatibility SDKs
If you wish to avoid using SignalWire's XML Bins, you can use our SDKs and host the instructions yourself. Please see our <Receive\> Verb instructions for specific code examples.
You'll then need to make your code accessible to SignalWire through a Webhook. We have a great guide on how to do this using ngrok!
Sending your first fax
There are three parts to sending a fax:
- A SignalWire Phone Number;
- The destination number;
- The publicly available media to be sent, such as a PDF file.
Using our REST API
Using our Send a Fax endpoint you can make a POST request to
https://<YOUR_SPACE_URL>.signalwire.com/api/laml/2010-04-01/Accounts/<YOUR_PROJECT_ID>/Faxes
with the following body parameters:
FromToMediaUrl
Using Compatibility SDKs
You can send faxes using our SDK's Send a Fax function, in multiple languages:
- JavaScript
- Python
- .NET
- PHP
- Ruby
const { RestClient } = require('@signalwire/compatibility-api')
const client = RestClient('YourProjectID', 'YourAuthToken', { signalwireSpaceUrl: 'example.signalwire.com' })

client.fax.faxes.create({
    from: '+13103383454',
    to: '+13104456789',
    mediaUrl: 'https://example.com/fax.pdf'
})
.then(fax => console.log(fax.sid))
.done();
from signalwire.rest import Client as signalwire_client

client = signalwire_client("YourProjectID", "YourAuthToken", signalwire_space_url = 'example.signalwire.com')

fax = client.fax.faxes \
    .create(
        from_='+13103383454',
        to='+13104456789',
        media_url='https://example.com/fax.pdf'
    )

print(fax.sid)
using System;
using System.Collections.Generic;
using Twilio;
using Twilio.Rest.Fax.V1;

class Program
{
    static void Main(string[] args)
{
    TwilioClient.Init("YourProjectID", "YourAuthToken", new Dictionary<string, object> { ["signalwireSpaceUrl"] = "<your-domain>.signalwire.com" });

    var fax = FaxResource.Create(
        from: "+13103383454",
        to: "+13104456789",
        mediaUrl: new Uri("https://example.com/fax.pdf")
    );

    Console.WriteLine(fax.Sid);
}
}
<?php
use SignalWire\Rest\Client;

  $client = new Client('YourProjectID', 'YourAuthToken', array("signalwireSpaceUrl" => "example.signalwire.com"));

  $fax = $client->fax->v1->faxes
                         ->create("+13104456789", // to
                                  "https://example.com/fax.pdf", // mediaUrl
                                  array("from" => "+13103383454")
                         );

  print($fax->sid);
?>
require 'signalwire/sdk'

@client = Signalwire::REST::Client.new 'YourProjectID', 'YourAuthToken', signalwire_space_url: "example.signalwire.com"

fax = @client.fax.faxes
.create(
    from: '+13103383454',
    to: '+13104456789',
    media_url: 'https://example.com/fax.pdf'
)
puts fax.sid
Next steps
Congratulations! You can now send and receive faxes using SignalWire. You are now ready to explore the advanced guides in the Fax section from the left menu.