Getting Started with Video API in React
SignalWire hosts community supported tools and libraries, including the @signalwire-community/react
package, which has a lot of React components and hooks to simplify your UI programming.
In this article, we will create a simple, dynamic UI for the SignalWire Video conference using the tools provided in
the @signalwire-community/react npm package.
Setting up the Project
First, to set up the codebase, we need to initialize an empty React project and install the @signalwire-community/react package.
- npm
- Yarn
- pnpm
npx create-react-app videoapp
cd videoapp

npm install @signalwire-community/react
npm run start
npx create-react-app videoapp
cd videoapp

yarn add @signalwire-community/react
yarn run start
npx create-react-app videoapp
cd videoapp

pnpm add @signalwire-community/react
pnpm run start
Getting a Video Conference Going
It is exceedingly simple to situate a fully functional video call within your React app. Simply use
either the <Video /> component or the <VideoConference /> from the package. As long as you supply it
with a valid token, the components and the SDK will handle the messy details needed for setting up a reliable
video connection between participants.
- PVC
- Video SDK
import { VideoConference } from "@signalwire-community/react";

export default function Video() {
  return <VideoConference token="A token taken from SignalWire PVC dashboard" />;
}
import { Video } from "@signalwire-community/react";

export default function Video() {
  return <Video token="<A token generated from Rest API>" />;
}
If you haven't already generated a token for Video, the Getting Started guide will help.
For demo purposes, feel free to use the following token. We maintain these particular tokens for demo of our guides, so expect to run into other developers here.
- PVC
- Video SDK
vpt_78f91a752d4d9c685e47bd4a19fe72c1
eyJ0eXAiOiJWUlQiLCJjaCI6InJlbGF5LnNpZ25hbHdpcmUuY29tIiwiYWxnIjoiSFM1MTIifQ.eyJpYXQiOjE2NjAyODA0ODUsImp0aSI6ImE4NTc5MzU2LTc0NGItNGM5OS05NWQ2LTZhMTY4YmEyNTFhZCIsInN1YiI6IjUwNmNlYTMzLWViNDctNGI1Ni04MmIwLWQzYzVhZmFmMzlkNCIsInUiOiJxdWlja3Rva2VudXNlciIsImphIjoibWVtYmVyIiwiciI6InJvb20iLCJzIjpbInJvb20ubGlzdF9hdmFpbGFibGVfbGF5b3V0cyIsInJvb20uc2VsZi5hdWRpb19tdXRlIiwicm9vbS5zZWxmLmF1ZGlvX3VubXV0ZSIsInJvb20uc2VsZi52aWRlb19tdXRlIiwicm9vbS5zZWxmLnZpZGVvX3VubXV0ZSIsInJvb20uc2VsZi5kZWFmIiwicm9vbS5zZWxmLnVuZGVhZiIsInJvb20uc2VsZi5zZXRfaW5wdXRfdm9sdW1lIiwicm9vbS5zZWxmLnNldF9vdXRwdXRfdm9sdW1lIiwicm9vbS5zZWxmLnNldF9pbnB1dF9zZW5zaXRpdml0eSIsInJvb20uaGlkZV92aWRlb19tdXRlZCIsInJvb20uc2hvd192aWRlb19tdXRlZCJdLCJhY3IiOnRydWUsIm1hIjoiYWxsIiwiZXJwIjp0cnVlLCJtdGEiOnt9LCJybXRhIjp7fX0.ke-qPuTmp6tUOgdHMHv_i82PjuWQgr8lsX_VRS_Krq4nwYt3REGhSn1p68N3gXTXxp7DGd6dIJIzJwjVZvdDmA
If you have setup everything till this point, you should have a working video call. If you were using <Video> it
will be a blank video call without any controls. But if you used <VideoConference />, it will be a fully functional
conference.
Adding Controls and Displaying the List of Members
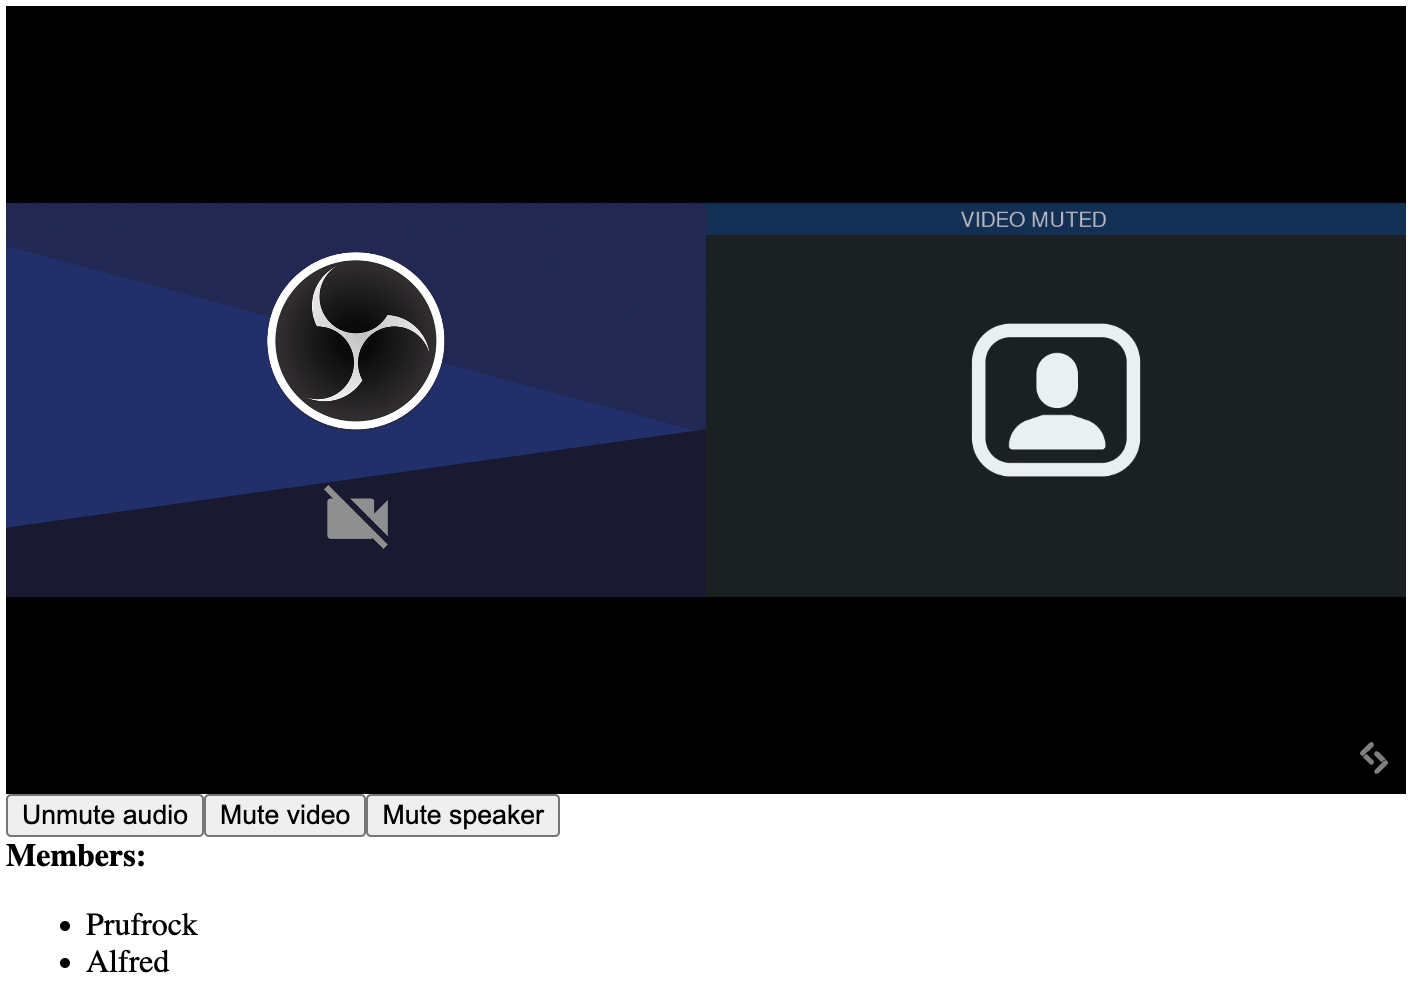
The hooks will be explored thoroughly in the article Using Hooks to Track Call State. For now, as an introduction, the following code example samples a common use case: a video conference with basic controls and a member list.
- PVC
- Video SDK
import { useCallback, useState } from "react";
import { VideoConference, useMembers, useStatus } from "@signalwire-community/react";

export default function DemoVideo() {
  const [roomSession, setRoomSession] = useState(null);
  const onRoomReady = useCallback((rs) => setRoomSession(rs), []);

  const { self, members } = useMembers(roomSession);
  const { active } = useStatus(roomSession);

  return (
    <div style={{ maxWidth: 700 }}>
      <VideoConference token="<Insert Token Here>" onRoomReady={onRoomReady} />

      {/* Populating controls for self */}
      {["audio", "video", "speaker"].map((io) => (
        <button onClick={self?.[io].toggle} disabled={!active}>
          {self?.[io].muted ? "Unmute " : "Mute "} {io}
        </button>
      ))}

      {/* Populating members */}
      <div>
        <b>Members: </b>
        <ul>
          {members.map((member) => (
            <li>
              {member.name}
              {member.talking && "🗣"}
            </li>
          ))}
        </ul>
      </div>
    </div>
  );
}
import { useCallback, useState } from "react";
import { Video, useMembers, useStatus } from "@signalwire-community/react";

export default function DemoVideo() {
  const [roomSession, setRoomSession] = useState(null);
  const onRoomReady = useCallback((rs) => setRoomSession(rs), []);

  const { self, members } = useMembers(roomSession);
  const { active } = useStatus(roomSession);

  return (
    <div style={{ maxWidth: 700 }}>
      <Video token="<Insert Token Here>" onRoomReady={onRoomReady} />

      {/* Populating controls for self */}
      {["audio", "video", "speaker"].map((io) => (
        <button onClick={self?.[io].toggle} disabled={!active}>
          {self?.[io].muted ? "Unmute " : "Mute "} {io}
        </button>
      ))}

      {/* Populating members */}
      <div>
        <b>Members: </b>
        <ul>
          {members.map((member) => (
            <li>
              {member.name}
              {member.talking && "🗣"}
            </li>
          ))}
        </ul>
      </div>
    </div>
  );
}

The Video Conference element and its controls. Result of the code example above.
Wrapping up
In this guide, we created a simple video conference for the web. This will be a great starting point for later explorations. But for now this is as far as we'll go. Check out the Github Repo for this project here.
If you need to, you can also take a look at the technical reference for @signalwire-community/react.
The natural continuation from here would be to follow the Using Hooks to Track Call State guide. Also, we invite you to explore and consider contributing to the SignalWire Community Repository. These components, and more, come from the community.